
Stripe is one of the most developer-friendly payment processors available today, having extensive and well-documented APIs and SDKs enabling you to finely customize your customer payment flow. If you have a simple use-case or would prefer to offload the majority of the checkout process, Stripe also provides Stripe Checkout where Stripe themselves will directly handle collecting the payment information and charging the customer.
There are several benefits to using Stripe Checkout instead of custom developing checkout pages, among them:
- Reduces internal development and maintenance
- Multiple language support
- Regulation Compliance including PCI DSS and Strong Customer Authentication (SCA)
- Better fraud detection
One of the biggest downsides of using Stripe Checkout is that customers need to be redirected to Stripe's website in order to complete the transaction, which has the potential to be a sub-optimal user experience. These are trade-offs that you'll need weigh when choosing an approach, however it should be noted that you're not locked in forever. It's perfectly reasonable to start processing customer orders with Stripe Checkout, and then at a later date switch to using a custom, streamlined checkout flow.
Stripe Checkout Overview
Regardless of whether you choose client-only or client/server approaches (we'll cover these in a moment), the the general Stripe Checkout flow is as follows:
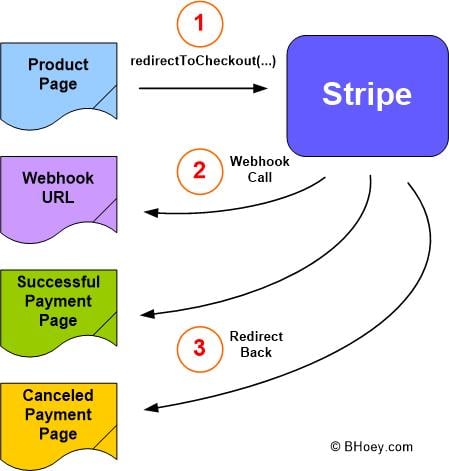
1. Starting from your product page, you'll call stripe.redirectToCheckout() JavaScript function with the appropriate parameters. This will redirect the user from your website to Stripe's to complete the payment process.
2. Stripe will call any webhooks registered for related events. This is an important part since Stripe recommends not depending only on the arrival at the success URL as confirmation (for example the customer could land on the success URL somehow without going through the Stripe payment process). Instead you should monitor the webhook events to confirm the payment was completed successfully.
3. Stripe will then redirect the user back to your site when they have either completed or canceled the checkout process. The URLs to redirect them to would have either been specified in the redirectToCheckout() call or specified on a checkout session beforehand (explained later).
Client-Only Vs Client/Server
There are two ways to invoke Stripe Checkout from your website: client-only and client/server.
The Client-Only approach is where all parameters are set in the frontend via Javascript and will be passed to Stripe Checkout on redirect. This method is the quickest to implement however is limited in what details you can pass to Stripe and the use-cases you can support versus the Client/Server approach. For example you aren't able to specify the Stripe customer id or handle the single-customer multiple subscriptions use-case using this approach. Stripe has example code on GitHub demonstrating the client-only approach.
Client/Server on the other hand is a staged approach where you first prepare a Checkout Session for the user on the backend and then reference it by id in the Stripe Javascript call on the frontend. This allows for much more control and is what the remainder of this post will cover.
Client/Server: Preparing the Checkout Session On The Backend
The first step in the client/server approach is to set up the mechanisms that will create a Checkout Session on the backend. This will be called by the frontend product page right before redirecting the user to Stripe.
First we define a create_checkout_session view that will handle requests from the frontend. Several of the details will be dependent on your particular environment, but the broad strokes are as follows:
# views.py

import stripe
from django.http import HttpRequest, JsonResponse
...
@login_required
def create_checkout_session(request: HttpRequest):

    customer = ... # get customer model based off request.user

    if request.method == 'POST':

        # Assign product price_id, to support multiple products you
        # can include a product indicator in the incoming POST data
        price_id = ... #

        # Set Stripe API key
        stripe.api_key = settings.STRIPE_SECRET_KEY

        # Create Stripe Checkout session
        checkout_session = stripe.checkout.Session.create(
            payment_method_types=["card"],
            mode="subscription",
            line_items=[
                {
                    "price": price_id,
                    "quantity": 1
                }
            ],
            customer=customer.id,
            success_url=f"https://YOURDOMAIN.com/payment/success?sessid={{CHECKOUT_SESSION_ID}}",
            cancel_url=f"https://YOURDOMAIN.com/payment/cancel", # The cancel_url is typically set to the original product page
        )

    return JsonResponse({'sessionId': checkout_session['id']})
One thing to note is that {CHECKOUT_SESSION_ID} template text will be replaced by Stripe when it calls back to the success_url. (The text in this case has double curly braces on each side since I am using python f-strings and to escape a curly brace you double it).
Then we associate a URL path to this view in our urls.py file:
# urls.py
...
path('stripe/create-checkout-session', views.create_checkout_session, name="stripe_create_checkout_session"),
Client/Server: Frontend Product Page
On the frontend, we'll add a Buy button and register an event listener for when its clicked. On a click event, we'll send a request to the backend to create the Checkout Session and wait for the response to get the new session's id. Finally we'll call redirectToCheckout with that session id, thereby allowing Stripe to connect the redirect request with the session previously created.
*Note the below code assumes the product page was rendered and supplied with context variables such as STRIPE_PUB_KEY and crsf_token.
    <script src="https://js.stripe.com/v3/"></script>

...

    <button type="button" id="buy-btn">Buy</button>

...

    <script>
      var DOMAIN = window.location.origin;

      var stripe = Stripe("{{ STRIPE_PUB_KEY }}");

      // Handle any errors from Checkout
      var handleResult = function (result) {
        if (result.error) {
          var displayError = document.getElementById("error-message");
          displayError.textContent = result.error.message;
        }
      };

      // Create a Checkout Session with the selected plan ID
      var createCheckoutSession = function() {
        return fetch("/stripe/create-checkout-session", {
          method: "POST",
          headers: {
            "Content-Type": "application/json",
            "X-CSRFToken":  '{{csrf_token}}',
          },
          // ... body section if you want to pass the product or price_id to the backend
        }).then(function(result) {
          return result.json();
        });
      };

    // Setup event handler to create a Checkout Session when button is clicked
      document
        .getElementById("buy-btn")
        .addEventListener("click", function (evt) {
          createCheckoutSession().then(function(data) {
            // Call Stripe.js method to redirect to the new Checkout page
            stripe
              .redirectToCheckout(
                {
                    sessionId: data.sessionId
                }
              )
              .then(handleResult);
          });
        });
    </script>
Client/Server: Finalizing The Checkout
The final step would be to listen for the 'checkout.session.completed' webhook event and update the user status on your backend. The webhook payload looks similar to the following:
{
  "id": "evt_123abc",
  "object": "event",
  "api_version": "2020-03-02",
  "created": 1596139528,
  "data": {
    "object": {
      "id": "cs_test_1234",
      "object": "checkout.session",
      "amount_subtotal": 1499,
      "amount_total": 1499,
      "cancel_url": "https://YOURDOMAIN.com/payment/cancel",
      "currency": "usd",
      "customer": "cus_1234",
      "livemode": false,
      "metadata": {
      },
      "mode": "subscription",
      "payment_method_types": [
        "card"
      ],
      "subscription": "sub_1234",
      "success_url": "https://YOURDOMAIN.com/payment/success?sessid={CHECKOUT_SESSION_ID}",
    }
  },
  "request": {
    "id": "req_1234",
    "idempotency_key": null
  },
  "type": "checkout.session.completed"
}
Then when the user gets redirected to your success URL, you can verify the (now replaced) sessid={CHECKOUT_SESSION_ID} URL parameter value against what was received via the webhook to confirm payment was successful.
Extra: What About djstripe?
djstripe is a Django app with additional functionality and models that aims to ease the integration between Django and Stripe.
There's nothing above that interferes with incorporating djstripe, in fact it would be a good fit for getting the customer object in the create_checkout_session view and relaying webhook events as Django signals. The instructions above were mainly intended to focus on common parts that can be implemented with or without djstripe.