Background
RabbitMQ is a robust message queue which features high message throughput, configurable acknowledgements, an intuitive management GUI and wide client library support. Written in Erlang, RabbitMQ has built a reputation for outstanding stability which makes it a popular choice as a core infrastructure system.
As you plan your overall messaging architecture a universal requirement is to minimize downtime from any single point of failure. Fortunately RabbitMQ comes equipped with built-in high-availability facilities, your tolerance for message loss will determine the which of the available HA options and approaches fits best. This post will mainly focus on setting up RabbitMQ mirrored queues which provide the highest protection against message loss.
Clustering vs Mirrored Queues
For the purpose of this post, its sufficient to know that RabbitMQ clusters do in fact replicate items like users, exchanges, routing keys and queues among member nodes, but importantly they do not replicate the messages themselves1. In the event of a RabbitMQ node failure, clients can reconnect to a different node, declare their queues and begin to receive published messages from that time on, however any messages that were still waiting in a queue located on the failed node will be lost if the host becomes unrecoverable.
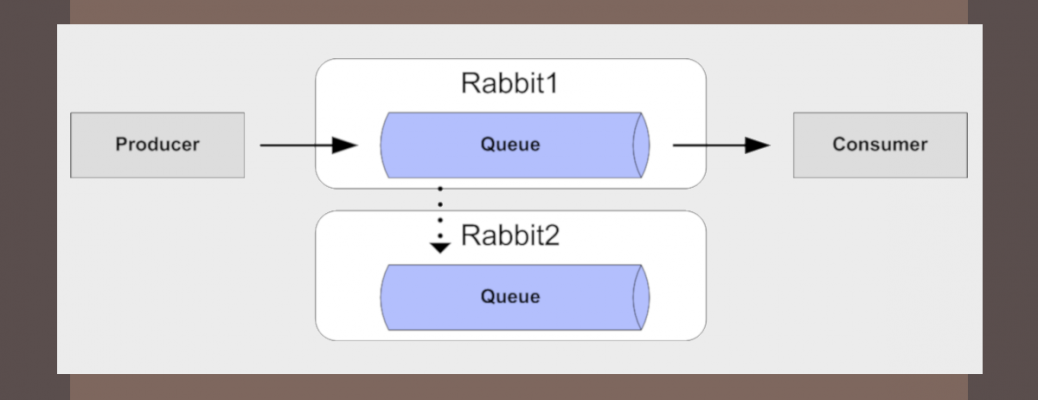
Mirrored queues introduce an additional level of protection by replicating published messages to other nodes in the cluster as well. In the event of a node failure, another cluster node will assume the queue master role for mirrored queues that were present on the failed node and then proceed to handle messaging operations for these mirrored queues thereafter, including serving messages that were still queued up at the time of the failure. This additional protection however does come at a cost of reduced message throughput and increased server load.
Requirements
Before we can configure mirrored queues we need to first have a RabbitMQ cluster in place.
RabbitMQ Cluster Requirements
- Two or more RabbitMQ nodes
- Identical Erlang cookie value in each node
- Peer discovery method
The identical Erlang cookie value is necessary for the nodes to authenticate between themselves to form a cluster. Since we will be using docker-compose for this demo we can specify this value as an environment variable and the default RabbitMQ docker-entrypoint.sh script will write this value to the correct file. If you are deploying RabbitMQ to hosts directly or using some other configuration orchestration see the official clustering guide for the location of the cookie file2.
The peer discovery method we will use is a hard-coded list of nodes that make up the cluster. This is the simplest method which avoids introducing additional dependencies, making it perfect for short demonstration purposes, but you'll likely want to select a more dynamic peer discovery method outlined in the cluster formation documentation3.
Mirrored Queues Requirements
- RabbitMQ Cluster
- High-availability policy
- One or more queues to apply the HA policy to
As mentioned above, mirrored queue functionality is layered on top of the cluster mechanisms, so you'll need to set up a cluster if you want to enable mirrored queues.
The high-availability policy defines the characteristics of the message replication, such as replication batch size, along with a pattern to match against queues you want mirrored. In the demo below we will indicate that the policy should apply to any queues with names starting with 'ha.'.
Demo
Demo Overview
For this demo we will spin up two RabbitMQ nodes from scratch in a cluster configuration using docker-compose. We will also leverage the management plugin to pre-define an HA policy, a single queue to be mirrored and other initial configurations so that our cluster has everything it needs to be fully functional from the start.
An important thing to note is that the data volume mapping has been commented out in the docker-compose.yml file. This was done since this demo is meant to highlight how to start fresh without any previous state information. When the cluster is running, state information will be persisted to the data volume and will be read in on subsequent starts. Since this demo does not map the data volume, any state information will be lost when the node is shut down. In real world use you'll want to map the data volume to an appropriate location on your system to avoid losing data on restart.
Demo Files
Below are the files necessary to start up two RabbitMQ nodes using docker-compose. They are intentionally minimalist to highlight the required elements and provide a stable base to allow for experimentation.
rabbitmq.conf
The new style rabbitmq.conf file below simply defines the peer discovery method, the nodes participating in the cluster and indicates the definitions file to load on start (this last functionality is provided by the management plugin).
# Load definitions file that includes HA policymanagement.load_definitions = /etc/rabbitmq/definitions.json# Declare cluster via host listcluster_formation.peer_discovery_backend = rabbit_peer_discovery_classic_configcluster_formation.classic_config.nodes.1 = rabbit@rabbit1cluster_formation.classic_config.nodes.2 = rabbit@rabbit2 |
rabbit1-definitions.json
The primary reason we need to use a definition file is to pre-define the HA policy that will apply to queues created in the cluster. An interesting surprise of using a definitions file however is that by using one on a fresh RabbitMQ instance, it will skip the automatic creation of the default 'guest' user. It is therefore necessary to additionally define one or more users explicitly in the definitions file.
{ "vhosts": [ { "name": "/" } ], "users": [ { "name": "admin", "password": "admin", "tags": "administrator" } ], "permissions": [ { "user":"admin", "vhost":"/", "configure":".*", "write":".*", "read":".*" } ], "policies": [ { "name": "ha-all", "apply-to": "all", "definition": { "ha-mode": "all", "ha-sync-mode": "automatic", "ha-sync-batch-size": 1 }, "pattern": "^ha\.", "priority": 0, "vhost": "/" } ], "queues": [ { "name": "ha.queue1", "vhost": "/", "durable": true, "auto_delete": false, "arguments": {} } ]} |
rabbit2-definitions.json
The rabbit2 definitions file can in fact just be an empty file as it will sync the configurations from the rabbit1 node when joining the cluster. However to err on the side of caution I prefer to include a user and permissions as well as the HA policy definition in this file in case the cluster gets in some kind of split-brain state that would need manual intervention.
It should be noted what is not defined in the rabbit2 file is the 'ha.queue1' definition since whichever node a queue is declared on becomes that queue's master node.
{ "vhosts": [ { "name": "/" } ], "users": [ { "name": "admin", "password": "admin", "tags": "administrator" } ], "permissions": [ { "user":"admin", "vhost":"/", "configure":".*", "write":".*", "read":".*" } ], "policies": [ { "name": "ha-all", "apply-to": "all", "definition": { "ha-mode": "all", "ha-sync-mode": "automatic", "ha-sync-batch-size": 1 }, "pattern": "^ha\.", "priority": 0, "vhost": "/" } ]} |
docker-compose.yml
The docker-compose.yml file brings everything together under one umbrella. It defines both RabbitMQ instances, the files and ports to map, and the shared Erlang cookie value.
One thing to note is that I've customized rabbit2's 'command' value in order to stagger the startup of the two nodes to avoid a race condition where neither node believes its the primary4.
version: "2"services: rabbit1: image: rabbitmq:3-management container_name: rabbit1 hostname: rabbit1 ports: - 5672:5672 - 15672:15672 environment: - RABBITMQ_ERLANG_COOKIE=shared_cookie volumes: - $PWD/rabbit1-definitions.json:/etc/rabbitmq/definitions.json:ro - $PWD/rabbitmq.conf:/etc/rabbitmq/rabbitmq.conf:ro # - $PWD/rabbit1-data:/var/lib/rabbitmq rabbit2: image: rabbitmq:3-management container_name: rabbit2 hostname: rabbit2 ports: - 5673:5672 - 15673:15672 environment: - RABBITMQ_ERLANG_COOKIE=shared_cookie volumes: - $PWD/rabbit2-definitions.json:/etc/rabbitmq/definitions.json:ro - $PWD/rabbitmq.conf:/etc/rabbitmq/rabbitmq.conf:ro # - $PWD/rabbit2-data:/var/lib/rabbitmq command: sh -c 'sleep 10 && rabbitmq-server' |
Running The Demo
Once the files are in place (and assuming you have docker-compose installed), its just a matter of running 'docker-compose up':
$ docker-compose upStarting rabbit1 ... doneStarting rabbit2 ... doneAttaching to rabbit1, rabbit2...rabbit1 | 2019-08-15 01:59:39.320 [info] <0.271.0> rabbit1 | Starting RabbitMQ 3.7.16 on Erlang 22.0.7...rabbit2 | 2019-08-15 01:59:49.050 [info] <0.296.0> rabbit2 | Starting RabbitMQ 3.7.16 on Erlang 22.0.7...rabbit2 | 2019-08-15 01:59:49.476 [info] <0.447.0> Mirrored queue 'ha.queue1' in vhost '/': Adding mirror on node rabbit@rabbit1: <8837.647.0>rabbit2 | 2019-08-15 01:59:49.485 [info] <0.447.0> Mirrored queue 'ha.queue1' in vhost '/': Synchronising: 0 messages to synchroniserabbit2 | 2019-08-15 01:59:49.485 [info] <0.447.0> Mirrored queue 'ha.queue1' in vhost '/': Synchronising: batch size: 4096rabbit2 | 2019-08-15 01:59:49.486 [info] <0.296.0> Running boot step load_definitions defined by app rabbitmq_managementrabbit2 | 2019-08-15 01:59:49.486 [info] <0.466.0> Mirrored queue 'ha.queue1' in vhost '/': Synchronising: all slaves already syncedrabbit2 | 2019-08-15 01:59:49.486 [info] <0.296.0> Applying definitions from /etc/rabbitmq/definitions.json...rabbit1 | 2019-08-15 01:59:49.500 [info] <0.385.0> rabbit on node rabbit@rabbit2 uprabbit2 | 2019-08-15 01:59:49.500 [info] <0.398.0> rabbit on node rabbit@rabbit1 up |
Verify Setup
After browsing to the admin GUI at http://localhost:15672 and logging in with admin/admin you should see the following:
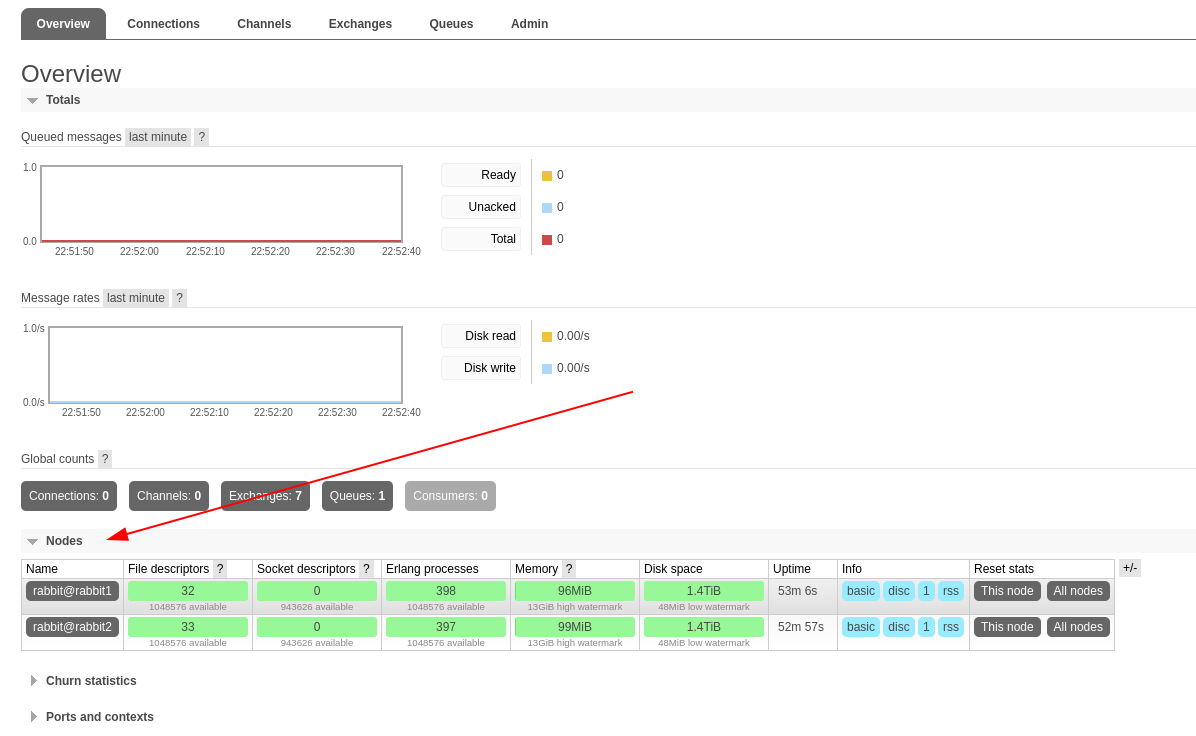 |
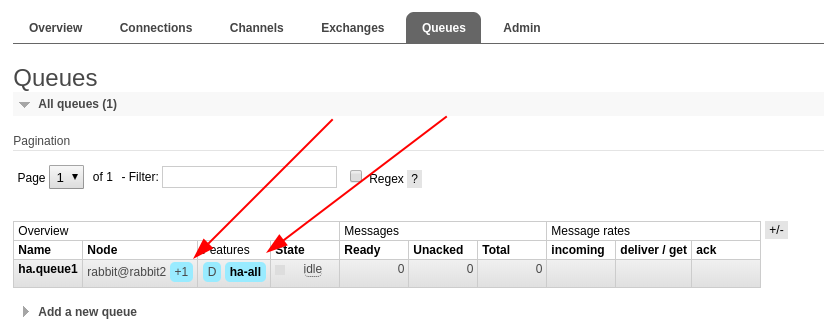 |
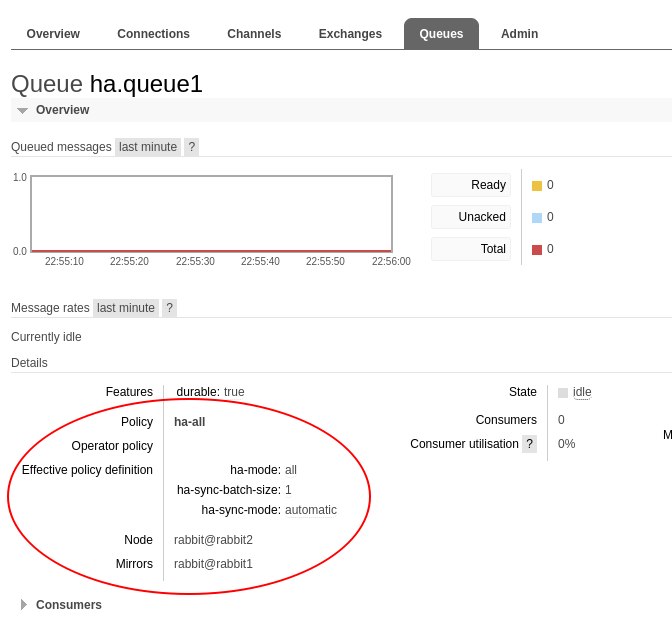 |
Client code
The client code setup is slightly different for connecting to mirrored queues, you'll want to indicate to the RabbitMQ/AMQP library that there are multiple cluster nodes so that in the event of a failure they can attempt to connect to another node.
The shuffling of the node list in both code snippets is to distribute clients across nodes. Keep in mind that the node where the queue was defined (ie the queue master) will still handle all messages routing for that queue.
Python
#!/usr/bin/env python3
import pika
import random

creds = pika.PlainCredentials('admin', 'admin')
params = [
           pika.ConnectionParameters(host='localhost', port=5672, credentials=creds),
           pika.ConnectionParameters(host='localhost', port=5673, credentials=creds),
         ]

random.shuffle(params)

connection = pika.BlockingConnection(params)
channel = connection.channel()

# Publish message
channel.basic_publish(
                       exchange='',
                       routing_key='ha.queue1',
                       body='Test message'
                     )

# Receive message
resp_get_ok, resp_props, resp_body = channel.basic_get(queue='ha.queue1', auto_ack=True)
print(resp_body)

channel.close()
connection.close()
Java
import com.rabbitmq.client.ConnectionFactory;
import com.rabbitmq.client.Connection;
import com.rabbitmq.client.Channel;
import com.rabbitmq.client.Address;
import com.rabbitmq.client.AMQP.BasicProperties;
import com.rabbitmq.client.GetResponse;
import java.util.Arrays;
import java.util.List;
import java.util.Collections;

public class RabbitMQTest{

    public static void main(String[] argv) throws Exception {

        List<Address> nodes = Arrays.asList(
                                 new Address("localhost", 5672),
                                 new Address("localhost", 5673)
                              );

        Collections.shuffle(nodes);

        ConnectionFactory factory = new ConnectionFactory();
        factory.setUsername("admin");
        factory.setPassword("admin");

        Connection connection = factory.newConnection(nodes);
        Channel channel = connection.createChannel();

        // Publish message
        String exch = "";
        BasicProperties props = null;
        String routing_key = "ha.queue1";
        String msg = "Test message";
        channel.basicPublish(exch, routing_key, props, msg.getBytes());

        // Receive message
        String queue = "ha.queue1";
        boolean autoAck = true;
        GetResponse response = channel.basicGet(queue, autoAck);
        byte[] body = response.getBody();
        System.out.println(new String(body));

        channel.close();
        connection.close();
    }
}
References
- What is Replicated?: https://www.rabbitmq.com/clustering.html#overview-what-is-replicated
- Clustering Guide: https://www.rabbitmq.com/clustering.html
- Cluster Formation and Peer Discovery: https://www.rabbitmq.com/cluster-formation.html
- Race Conditions During Initial Cluster Formation: https://www.rabbitmq.com/cluster-formation.html#initial-formation-race-condition
- Highly Available (Mirrored) Queues: https://www.rabbitmq.com/ha.html
- Loading Definitions (Schema) at Startuphttps://www.rabbitmq.com/management.html#load-definitions